안녕하세요. 명월입니다.
이 글은 String boot와 React를 연결하는 방법(Build 하는 방법)에 대한 글입니다.
최근에 프로젝트 트랜드는 프론트엔드와 서버사이드를 구분해서 많이 작업들 합니다. 사실 이렇게 분업해서 작업하는 스타일이 꽤 오래전부터 하였는데 제가 상당히 늦은 감이 있네요. 저는 최근까지 Javascript와 Jquery를 사용해서 화면과 프로그램을 작성했습니다.
프로젝트를 혼자하는 것은 아니었지만 이런 상황이 솔직히 크게 불편하지는 않았습니다. Jquery로도 충분히 SPA(Single page application)를 구현을 했고 제가 느끼기에 크게 느리다고 생각도 들지도 않았습니다.
그런데 Jquery에서 React를 이동해야 겠다라고 생각을 한 것이 하나는 라이브러리들이 탈 Jquery를 외치면서 Jquery를 지원하지 않는 것입니다. 그러면서 굳이 Jquery를 사용할 필요가 있을까? 라는 생각부터 입니다.
그와 동시에 많은 라이브러리들이 Angular, Vue, React를 지원하고 그 중 React를 선택한 것은 단순히 다운로드가 높고 많은 사람이 사용하는 프레임워크라서 선택했습니다.
예전에는 화면을 만들 때는 그냥 eclipse에서 html 작성하고 css, js 작성하였는데 React의 경우는 eclipse에서 작성하기가 쉽지가 않네요.
그래서 React는 Node.js를 사용해서 Visual studio code로 개발하고 Spring boot는 Intellij나 eclipse에서 개발합니다.
각기 다른 IDE툴에서 개발하면 최종적으로 build 하고 나면 결과물이 따로 생성되기 때문에 이것을 하나로 합치는 작업이 필요합니다.
eclipse에서 Spring boot의 개발 환경을 설정하는 방법은 이전에 설명했습니다.
링크 - [Java] 57. Eclipse에서 Spring boot를 설정하는 방법
그리고 React를 Visual studio code에 개발 환경을 설정하는 방법도 설명했습니다.
링크 - [Javascript] Node.js를 설치하고 React를 사용하는 방법
그러면 일단 두 개의 개발환경을 연결하는 방법은 매우 간단합니다.
React의 package.json 파일에 Spring boot의 주소를 연결하면 됩니다.

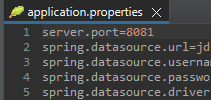
저는 eclipse에서 Spring boot의 포트를 8081로 설정하고 React에서 Proxy를 8081로 접속하는 것으로 맞추었습니다.
그리고 eclipse에서 다음과 같은 데이터를 취득하는 함수를 만듭니다.
package com.example.demo.controller;

import org.springframework.stereotype.Controller;
import org.springframework.ui.Model;
import org.springframework.web.bind.annotation.RequestMapping;

// 컨트럴러 어트리뷰트
@Controller
public class AjaxController {
  // 요청 매핑 어트리뷰트
  @RequestMapping(value = "/data/hello.json")
  // String의 데이터
  @ResponseBody
  public String helloworld(Model model) {
    // 결과는 hello world
    return "hello world";
  }
}
import React, { useEffect, useState } from 'react';

// ajax 함수
const ajax = (url: string, method = "GET", data: object | null, success: ((req: XMLHttpRequest) => void) | undefined | null = null, error: ((req: XMLHttpRequest) => void) | undefined | null = null, sync = true): void => {
  // XMLHttpRequest 객체
  let xhr = new XMLHttpRequest();
  // 버퍼 변수
  let json = "";
  // 비동기 상태 변경 이벤트
  xhr.onreadystatechange = (e) => {
    // XMLHttpRequest 객체
    let req = e.target as XMLHttpRequest;
    // null이면 처리 안함
    if (req == null) {
      return;
    }
    // 비동기 처리가 완료되면 (Code state - 4)
    if (req.readyState === XMLHttpRequest.DONE) {
      // http status 200 이면(정상 요청이면)
      if (req.status === 200) {
        // success 함수 호출
        if (success !== null && success !== undefined) {
          success.call(this, req);
        }
      } else {
        // error 함수 호출
        if (error !== null && error !== undefined) {
          error.call(this, req);
        }
      }
    }
  }
  // data 값이 null이 아니면
  if (data != null) {
    // json 타입으로 변경
    json = JSON.stringify(data);
  }
  // XMLHttpRequest 기본 설정
  xhr.open(method, url, sync);
  // XMLHttpRequest 해더 설정
  xhr.setRequestHeader('Content-Type', 'application/json');
  xhr.setRequestHeader('Cache-Control', 'no-cache');
  // 비동기 통신 시작
  xhr.send(json);
};
// React 시작 함수
function App() {
  // message 상태 처리
  const [message, setMessage] = useState("");
  useEffect(() => {
    // 비동기 처리
    ajax("/data/hello.json", "GET", null, (msg) => {
      // 상태 변경
      setMessage(msg.responseText);
    }, null, false);
  }, []);
  // 화면 표시
  return (
    <>
      {message}
    </>
  );
}

export default App;


Spring boot와 react가 연결된 것을 확인할 수 있습니다.
저의 경우는 프로트엔드와 서버사이드를 같이 개발하니 하나의 로컬에서 작업을 합니다만, 만약 여러 사람과 분업이 되어 있다면 그에 맞는 개발 서버로 proxy를 연결하면 될 듯하네요.
여기까지가 개발 환경이고 build 설정을 맞추겠습니다.
build는 먼저 프론트엔드의 React 소스를 빌드하여 html과 css, js를 생성합니다. 그리고 빌드된 파일을 Spring boot의 static 폴더에 넣어서 Spring boot를 빌드하면 됩니다.
제가 이야기는 쉬운데 설정하는 게 쉽지가 않더라고요. 그래서 구글링으로 참조를 했습니다.
링크 - https://github.com/eirslett/frontend-maven-plugin/issues/872
링크 - https://github.com/eirslett/frontend-maven-plugin
그럼 Spring boot의 pom.xml의 설정을 확인하겠습니다.
<!-- 프로퍼티 설정 -->
<properties>
  <java.version>11</java.version>
  <frontend-src-dir>${project.basedir}/../my-app</frontend-src-dir>
  <frontend-maven-plugin.version>1.12.1</frontend-maven-plugin.version>
</properties>
<build>
  <plugins>
    <!-- Spring boot를 jar로 실행 시키기 위한 빌드 패키지 -->
    <plugin>
      <groupId>org.springframework.boot</groupId>
      <artifactId>spring-boot-maven-plugin</artifactId>
    </plugin>
    <!-- React를 빌드하기 위한 패키지 -->
    <plugin>
      <groupId>com.github.eirslett</groupId>
      <artifactId>frontend-maven-plugin</artifactId>
      <version>${frontend-maven-plugin.version}</version>
      <!-- 버전 설정은 build를 하는 환경의 nodejs와 npm 버전 설정 -->
      <configuration>
        <nodeVersion>v16.14.2</nodeVersion>
        <npmVersion>8.5.0</npmVersion>
        <workingDirectory>${frontend-src-dir}</workingDirectory>
        <installDirectory>${project.build.directory}</installDirectory>
      </configuration>
      <!-- 실행 명령어 -->
      <executions>
        <execution>
          <id>install-frontend-tools</id>
          <goals>
            <goal>install-node-and-npm</goal>
          </goals>
        </execution>
        <!-- npm 패키지 다운 및 설치 -->
        <execution>
          <id>npm install</id>
          <goals>
            <goal>npm</goal>
          </goals>
          <configuration>
            <arguments>install</arguments>
          </configuration>
        </execution>
        <!-- npm 빌드 -->
        <execution>
          <id>npm run build</id>
          <goals>
            <goal>npm</goal>
          </goals>
          <configuration>
            <arguments>run build</arguments>
          </configuration>
        </execution>
      </executions>
    </plugin>
    <!-- React가 빌드된 폴더에서 Spring boot 프로젝트로 복사하는 패키지 -->
    <plugin>
      <artifactId>maven-resources-plugin</artifactId>
      <executions>
        <execution>
          <id>position-react-build</id>
          <goals>
            <goal>copy-resources</goal>
          </goals>
          <phase>prepare-package</phase>
          <configuration>
            <!-- Spring boot의 html 파일 경로 -->
            <outputDirectory>${project.build.outputDirectory}/static</outputDirectory>
            <resources>
              <resource>
                <directory>${frontend-src-dir}/build</directory>
                <filtering>false</filtering>
              </resource>
            </resources>
          </configuration>
        </execution>
      </executions>
    </plugin>
  </plugins>
</build>
위에서 Node.js와 npm의 버전을 실행하는 환경으로 맞추어야 합니다.
콘솔에서 npm version 명령어로 확인할 수 있습니다.

설정은 완료되었습니다.
이제 빌드해 보겠습니다.
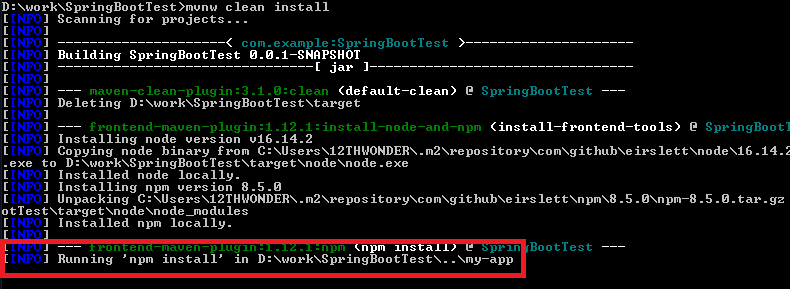
로그에 React가 빌드되는 것을 확인할 수 있네요.
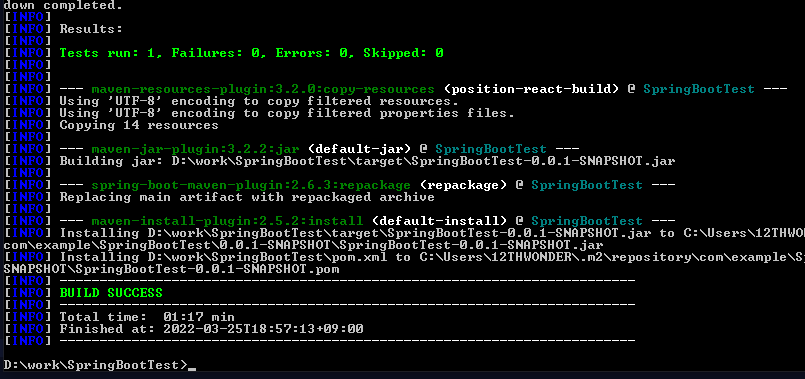
build가 완료되었습니다. 그럼 target 폴더에 jar 파일이 생성된 것을 확인할 수 있습니다.
먼저 윈도우에서 압축 내용을 확인해 보겠습니다.

jar 파일 안에 React의 html과 js, css가 만들어져서 들어가 있는 것을 확인할 수 있습니다.
그럼 jar 파일을 실행 시켜 봅니다.

실행은 문제없이 되네요.
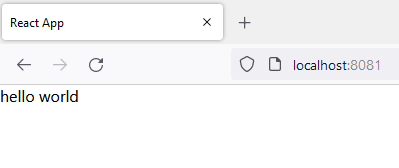
화면도 문제없이 실행됩니다.
이로써 React와 Spring boot를 설정한 개발 환경 설정은 완료가 되었네요.
여기까지 String boot와 React를 연결하는 방법(Build 하는 방법)에 대한 글이었습니다.
궁금한 점이나 잘못된 점이 있으면 댓글 부탁드립니다.
'Study > Java' 카테고리의 다른 글
| [Java] 62. Spring boot에서 Web-Filter를 설정하는 방법(Spring Security) (2) | 2022.03.15 |
|---|---|
| [Java] 61. Spring boot에서 Redis 데이터베이스를 이용한 세션 클러스터링 설정하는 방법 (1) | 2022.03.01 |
| [Java] 60. Spring boot에서 Apache 연결과 로드벨런싱을 설정하는 방법 (3) | 2022.02.28 |
| [Java] 59. Spring boot의 JPA에서 EntityManager를 사용하는 방법 (0) | 2022.02.25 |
| [Java] 58. Eclipse에서 Spring boot의 JPA를 설정하는 방법 (2) | 2022.02.23 |
| [Java] 57. Eclipse에서 Spring boot를 설정하는 방법 (1) | 2022.02.22 |
| [Java] 56. Web service의 Servlet에서 초기화 작업(properties 설정) (0) | 2021.07.02 |
| [Java] 55. Spring framework에서 문자 깨짐 문제를 해결하는 방법(Encoding 설정) (0) | 2021.06.30 |